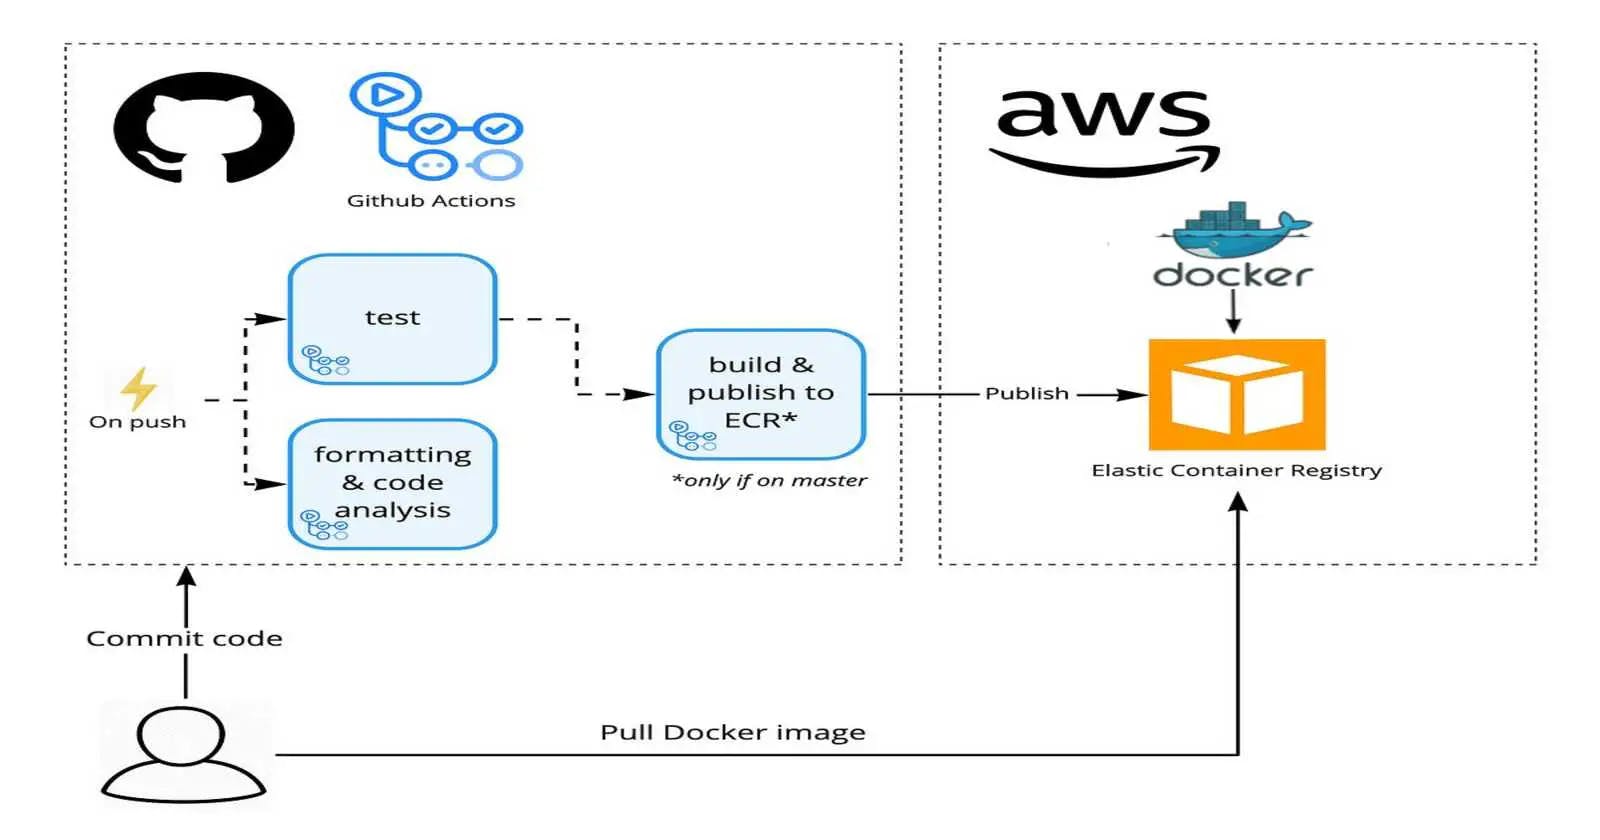
In this article we are going to learn, Create Docker file for NodeJS App, Make a package.json file, Create Workflow in GitHub Actions, Create Repository AWS ECR, Create Secrets in GitHub, How to Build and Push Docker Image to AWS ECR Using GitHub Actions.
AWS Account
Github Account
You must have knowledge of GitHub and Git Commands
Step 1:Create Repository on Github
First of all you need to create new repository on your GitHub account or you can use old repository also.
Fork this repo if needed: https://github.com/msnehabawane/Tech-assignment.git

Step 2: We have to make dockerfile for the NodeJs App on github repository .
# Use an official Node.js runtime as the base image
FROM node:14

# Set the working directory in the container to /app
WORKDIR /usr/src/app

# Copy package.json and package-lock.json to the working directory
COPY package.json .

# Install the application dependencies
RUN npm install

# Copy the rest of the application code to the working directory
COPY . .

# Make port 3000 available outside the container
EXPOSE 3000

# Run the application when the container launches
CMD ["node", "index.js"]
Step 3 : We need to create package.json file on Github repository using below code.
{
    "name": "docker_nodejs_demo",
    "version": "1.0.0",
    "description": "",
    "main": "index.js",
    "scripts": {
      "test": "echo \"Error: no test specified\" && exit 1"
    },
    "keywords": [],
    "author": "",
    "license": "ISC",
    "dependencies": {
      "config": "^3.3.6",
      "express": "^4.17.1"
    }
  }
Step#3:Cre
Step 4 : Create GitHub Workflow Action on github repository.
Now configure the GitHub Actions. For the Image building and pushing it to AWS ECR and here we are going to use a great tool from GitHub called GitHub Actions.
Now let’s create our workflow using below file:
name: Build and push image to ECR
on: push
jobs:
  build:
    name: Build Image
    runs-on: ubuntu-latest
    steps:
    - name: Check out code
      uses: actions/checkout@v2
    - name: Configure AWS credentials
      uses: aws-actions/configure-aws-credentials@v1
      with:
        aws-access-key-id: ${{ secrets.AWS_ACCESS_KEY_ID }}
        aws-secret-access-key: ${{ secrets.AWS_SECRET_ACCESS_KEY }}
        aws-region: ap-south-1

    - name: Login to Amazon ECR
      id: login-ecr
      uses: aws-actions/amazon-ecr-login@v1

    - name: Build, tag, and push image to Amazon ECR
      env:
        ECR_REGISTRY: ${{ steps.login-ecr.outputs.registry }}
        ECR_REPOSITORY: my-repo
        IMAGE_TAG: my_image
      run: |
        docker build -t $ECR_REGISTRY/$ECR_REPOSITORY:$IMAGE_TAG .
        docker push $ECR_REGISTRY/$ECR_REPOSITORY:$IMAGE_TAG
Let’s understand our workflow first
Steps: Steps represent a sequence of tasks that will be executed as part of the job steps
Job Name: Check out code
It job simply checks out our GitHub repository for “Dockerfile” to build the docker image
Job Name: Configure AWS credentials
In this job we need to configure AWS login Credentials. For accessing the AWS ECR we need to define a custom Role in later steps.
Job Name: Build, tag, and push image to Amazon ECR
In this step we are going to build the Docker Image by copying using the Code in our Repository, tagging the Image with Version and pushing Image to AWS ECR
Clone your github repository to local desktop and run the below command

Step 5 :Create Repository AWS ECR
Go to the AWS console and find for the ECR

Click on get started and create your repository

Click on create Repository

Give the name to your repository

Keep other settings as it is for now and create repository

Here is our newly created repository

Make sure that the name of your Repository name on AWS ECR and the name of repository mention on github action workflow should be same
Step 6:Create Secrets In Github
To access our AWS ECR, so here we need to add AWS secrets for AWS_ACCESS_KEY_ID and AWS_SECRET_ACCESS_KEY
Now here we need to add AWS secrets for that secrets we have to create IAM Role
Note: Your IAM user has proper valid IAM permissions. Your IAM user must have “AmazonEC2ContainerRegistryFullAccess”

Click on User

Give the name for your username

give the required permission click on next

Note: Your IAM user has proper valid IAM permissions. Your IAM user must have “AmazonEC2ContainerRegistryFullAccess”

Click on create user

Here is our newly created user

Now go to the Create access key


Create Access key.

Here we got our access key and secret access key

Now add the above credentials on github
So go to the settings and create secrets and set them as Environment Variables.
settings -->secrets and variables --> Action --> new repository secrets

Add Access key ID

Add Secret Access Key


Step 7:Build & Push Docker Image to AWS ECR Using GitHub Actions
Go to the github repository click on Actions
Now you can also open the ECR repository and check for the final image with the latest tag inside it

Congratulations you have successfully upload the image on AWS ECR

Conclusion:
In conclusion, automating Docker image upload to AWS Elastic Container Registry (ECR) using GitHub Actions provides a streamlined and efficient workflow for developers deploying containerized applications. By integrating continuous integration and deployment processes into the development pipeline, teams can ensure faster and more reliable releases.
GitHub Actions offers a powerful platform for automating various tasks, and when combined with Docker and AWS ECR, it simplifies the process of building, testing, and deploying containerized applications. This automation not only reduces manual intervention but also enhances the consistency and repeatability of the deployment process.
Stay tuned for my next blog . I will keep sharing my learnings and knowledge here with you.
Let's learn together! I appreciate any comments or suggestions you may have to improve my blog content.
Happy Learning!
Thank you,
Neha Bawane
